

If you are an author or narrator, learning to master your audiobook saves money because you won’t have to pay someone else. Mastering occurs after editing and proofing*. It’s the process of starting with a good recording and turning it into something great.
Mastering is composed of four major steps:
- Noise Reduction – This step removes the background noise from your audio file.
- Compression – This process reduces the dynamic range of the audio recording so that the loud parts are quieter, and the quiet parts are louder.
- Normalization – This phase limits the loudness of the recording.
- RMS & Peak Values – This segment checks that the average and maximum are within ACX’s requirements.
In the rest of this article, I’ll show you the best tips for beginners to get started. In addition, I’ve outlined a mini-guide in section How to Master Audio Files.
This article is focused on Audiobook Creation Exchange (ACX) because most audiobooks are sold through Audible and Amazon.
* If you would like to learn more about editing and proofing, take a look at my articles 19 Audiobook Editing Tips and What is Audiobook Proofing?

Start with a good recording
Mastering becomes significantly easier when you start with a good recording. This means you need a:
- Soundproofed home studio – Your home studio should have soft surfaces to deaden any echoes, and it should be proofed from other sounds in your home.
- Closed-back headphones – These are studio-quality headphones that will help you to monitor your voice as you are recording.
- High-quality microphone – This is a studio-quality microphone, which should be about 6 inches from your face. If you would like to learn more about how far you should be from your microphone, take a look at my article Microphone Distance From Your Mouth.
- Pop Filter – This equipment blocks puffs of air created by pronouncing hard consonant sounds like “P” or “B.”
- Digital Audio Workstation (DAW) – This tool is software used to edit and master your audiobook recording.
What is dB?
Sound loudness or volume is measured in decibels (dB). For sounds in the environment, day-to-day conversation is 60dB and 0dB is silence. In this scale, every 6dBs the sound has doubled. Therefore, 26dB is twice as loud at 20dB.
For sounds from your recording equipment, the scale is negative. The loudest sound you can record without distortion is 0dB. The equipment will allow you to record a little higher than 0dB and usually the distortion is not noticeable to the human ear. In this scale, the loudest sound is 0dB, -6dB is half as loud, and -60dB is 1000 times quieter.
If you would like to find out more about decibels, take a look at Why does my Amplifier use Negative dB for Volume from the Cable Chick.
What is Noise Floor?
Room tone is a recording of the room where narration will take place while that narrator is quiet. If you have a very good microphone, it may pick up extraneous noises in the house like the refrigerator, air conditioner, computer, etc. This noise is called the noise floor.
The ACX requirements are for a noise floor between -60dB and -50dB.
If your noise floor is too loud, you should soundproof your home studio. However, if you’ve already made the recording, then you could try to remove the noise by using an equalizer plugin (see How to Master Audio Files). The equalizer can filter or remove some frequencies in the noise floor which will allow you to meet ACX’s requirements..
What is Root Mean Square (RMS)?
RMS is a way of calculating the average value. In the case of audio, it’s a way to determine the average loudness of an audiobook.
ACX requirements are -23dB and -18dB RMS. This means in an audiobook, at different parts of the narration, the RMS will vary a little. It should remain between -23dB and -18dB.
What is peaking?
The loudest parts of the audio file are called the peaks. When the narrator changes from whispering a line to yelling another line, the yelled portions of the narration will peak. The ACX requirement is less than -3dB.
ACX Mastering Requirements
These are the requirements set by ACX, online audiobook stores and distributors.
- The RMS of your audio files should measure between -23dB and -18dB RMS.
- The peaks should hover around -3dB.
- The noise floor should fall between -60dB and -50dB.
- The files should be MP3 format at 192kps, Constant Bit Rate (CBR).
- The sample rate should be 44.1 kHz.
- All files must be in mono or stereo, but not a combination of both.
If you would like more information, take a look at this article on the ACX website ACX Audio Submission Requirements.
Why follow the mastering requirements?
These requirements allow ACX to offer audiobooks on several different devices (iPhone, tablet, desktop) and different platforms (Audible, Amazon, & iTunes) while allowing the customer to have a good listener experience.

How to master audio files (A Mini-Guide)
Mastering allows you to improve the overall quality of the audio. Below are some general steps to master an audio file.
Step 1 – Noise Reduction
In this part, you will use a plugin for your DAW called an equalizer. This plugin allows you to remove or filter out unwanted frequencies. These unwanted frequencies can be caused by a computer fan, air conditioner, refrigerator, and more.
Examples of unwanted frequencies are hums (low frequency) and hisses (high frequency). If left alone, these sounds will eventually irritate the listener.
Keep in mind that the equalizer could affect the voice of the narrator causing it to distort. Always listen to the audio after you have used the equalizer. It’s a setting in the plugin you’ll have to adjust to get the correct value.
If you would like to learn more about equalizers, take a look at Mastering Audiobooks with Alex the Audio Scientist from the ACX blog.
Step 2 – Compression
In this segment, you should adjust your audio file if it is too dynamic. This means the soft parts are too soft and the loud parts are too loud. If you do nothing, the listener will have to constantly adjust the volume – turning it up during the soft parts and down during the loud parts of the narration.
You’ll need a compressor that squeezes the loud parts down and increases the soft parts of the audio file. In this way, the loud and soft portions are closer. This creates a good listener experience.
If you would like to learn more about Compression, take a look at The Complete Guide to Home Audiobook Narration and Production from author Alex Berg.
Step 3 – Normalization
In this section, you should use a plugin to your DAW called a limiter. This limiter raises the loud parts of the narration to a limit you set (ACX requirement is -3dB). This also increases the softer parts of the audio resulting in an evened out the narration. Consequently, it improves the listener’s experience.
If you would like to learn more about normalization, take at look at this ACX blog Mastering Audiobooks with Alex the Audio Scientist.
Step 4 – RMS and Peak Values
You use this process when the audio file’s RMS (average values) and peak values (maximum) are outside of the ACX requirements. If you are new to mastering, you may not know that (depending on your DAW) you have two options to adjust the RMS and peak values.
If you are using Adobe Audition or a more advanced DAW, I recommend using the automatic process. If you are using Audacity, you may need to use the manual process.
Automatic
Your first option is to automatically adjust the RMS and peak value in your audio files using your DAW. This is usually an additional plugin that may or may not cost more money.
If the settings in your DAW are -20dB RMS and -3.5dB peak values, it will automatically adjust each file to make sure they fit in these requirements. Listen to your entire audiobook to make sure it sounds the way you want.
Manual
Your second option is to adjust your files manually. You may take this option if you want a different sound than the one you get from your DAW’s automatic adjustment. Follow the steps below.
- Use your DAW to calculate the RMS and peak values for each audio file in your audiobook.
- If you find a file that has an RMS outside of -23dB to -18dB, then you’ll need to adjust that file’s RMS values.
- Adjust that file’s RMS value. For example, you can use -20dB as the target RMS value. This will adjust the RMS as well as the peak value for the file. Many times this puts the peak value above -3dB. Therefore, you’ll need to adjust this peak value.
- If you adjust the peak value so that it’s less than -3dB, you may push the RMS for that file outside of its acceptable range.
This process is what makes mastering audiobooks difficult. As you try to adjust the RMS, you disturb the peak, and as you try to adjust the peak, you disturb the RMS.
- A possible solution is to first correct the RMS value for the audio file. For example, you can use -20dB. This will push the peak above -3dB.
- Next, you can use a hard limiter to remove the peaks outside of -3dB. These two adjustments force the file to comply with ACX’s requirements.
- If most of the peaks are under -3dB anyway, then this will have a negligible effect on the sound of the audio file. If it does affect the way the narrator sounds, you may have to choose another RMS target and try again.
What do Noise Reduction, Compression, and Normalization look like in a DAW?
The following figures show audio files in Audacity. They illustrate how the files change when you correct for noise (noise reduction), how you reduce the dynamic characteristics of the file (compression), how you limit peaks (normalization).
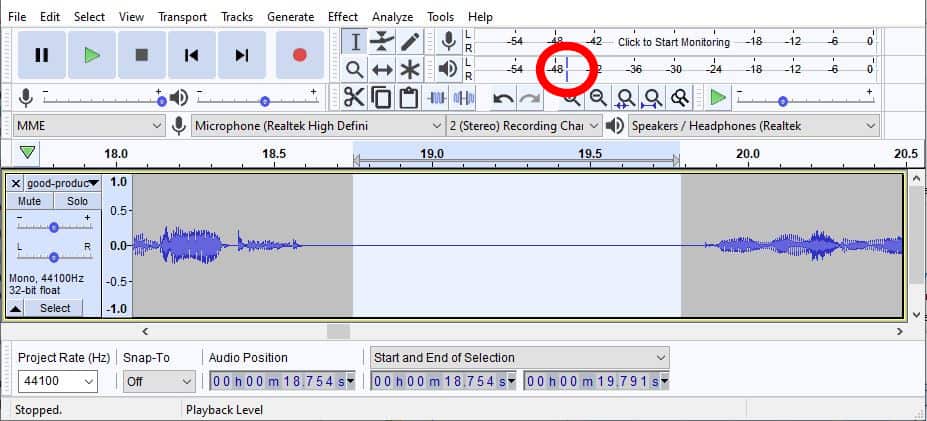
Figures 1 and 2 are before and after images of noise reduction is applied to a sample of an audio file.
Figure 1 is a raw recording of an audiobook. Figure 2 is the same recording with the noise reduced. Notice that the noise floor in Figure 1 is -47dB, which is outside of ACX’s noise requirements (-60dB to -50dB).
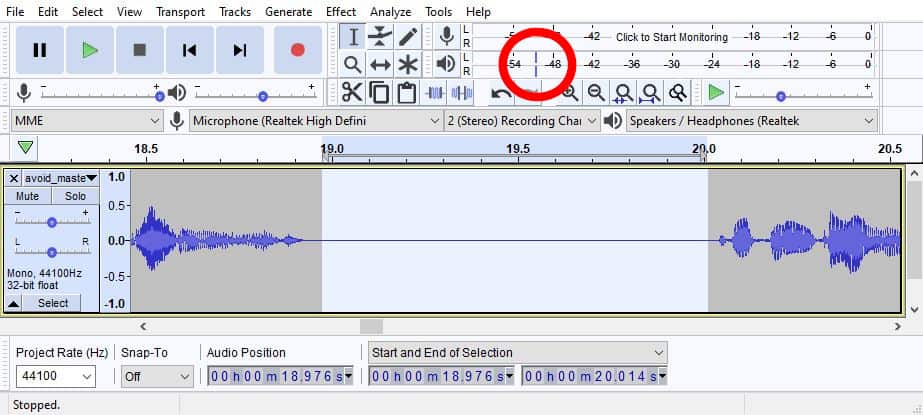
After an equalizer is used to reduce the noise, Figure 2 shows a noise level that is now -51dB, which is within ACX’s noise requirements.
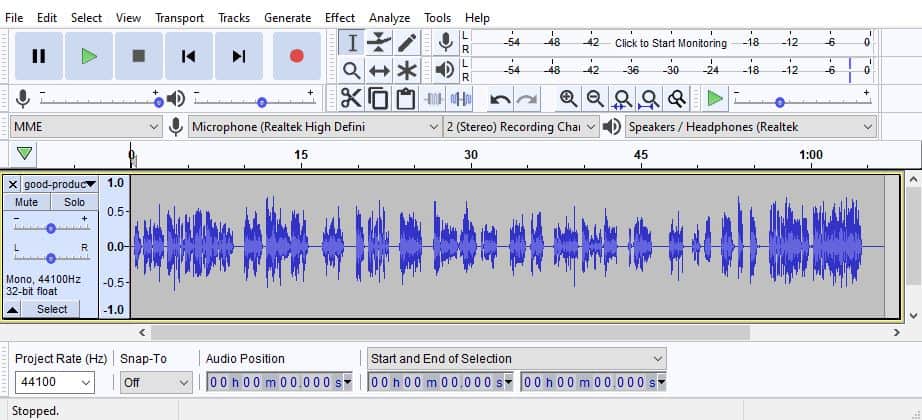
Figures 3 and 4 are before and after images of compression and narration applied to a portion of an audiobook.
Figure 3 is an edited sample of narration. Figure 4 is a mastered sample of the same audiobook.
Notice that the image in Figure 3 is more dynamic. In other words, the softer parts of the audiobook are much softer than the louder parts. Figure 4 displays an image with more balance between the soft and loud portions.
Also, the Figure 3 shows an image that drifts slightly above -3dB whereas Figure 4 displays an image that stays at or below -3db.

Conclusion
Mastering is the last step in the process of preparing an audiobook for submission to ACX. It can also, be the most complicated step. However, this article provides a mini-guide as well as a host of tips to get beginners started on their journey.
Have you mastered an audio file? What was the most challenging part of the process? Let me know in the comments below.